

Have you been hanging on the edge of your seat waiting for Part 2? I know we have! If you haven’t read through A Look Inside Menufy Manager | Part 1 yet, go check it out and come back here for even more information.
Log into your Menufy Manager to explore for yourself, and come back if you have any questions.
REFRESHER: WHAT IS MENUFY MANAGER?
Menufy Manager is the central hub for managing your restaurant’s Menufy account, website, and online orders. Here’s a list of the most noteworthy things you can do:
View and manage all your Menufy online orders
Add tips to an order, refund orders, or adjust totals
View all your payment statements
View your sales reports
Issue store credit
Temporarily shut off your restaurant's online ordering
Modify your delivery zones and delivery settings
View the current status of Menufy's services
Order Menufy tablets, printers, and other Menufy services
Make minor menu edits (POS integration menu editing will vary, depending on the company)
Create and schedule free email marketing campaigns
Set up coupons, deals, and customer loyalty rewards
Our restaurant partners can also access other tools, like email marketing, coupons, and customer rewards. When you log into your Menufy Manager account, you’ll see all of these options on the left-hand side of your screen:
Dashboard
Menufy Store
POS Integration
Orders
Carryout Settings
Curbside Pickup
Delivery Settings
Menu
Notifications
Hours & ETAs
Reports
Discounts & Deals
In this second part, we will discuss the following four tools: the Carryout Settings, Curbside Pickup, Delivery Settings, and Menu.
DIVING INTO THE MENUFY MANAGER HUB
Carryout Settings
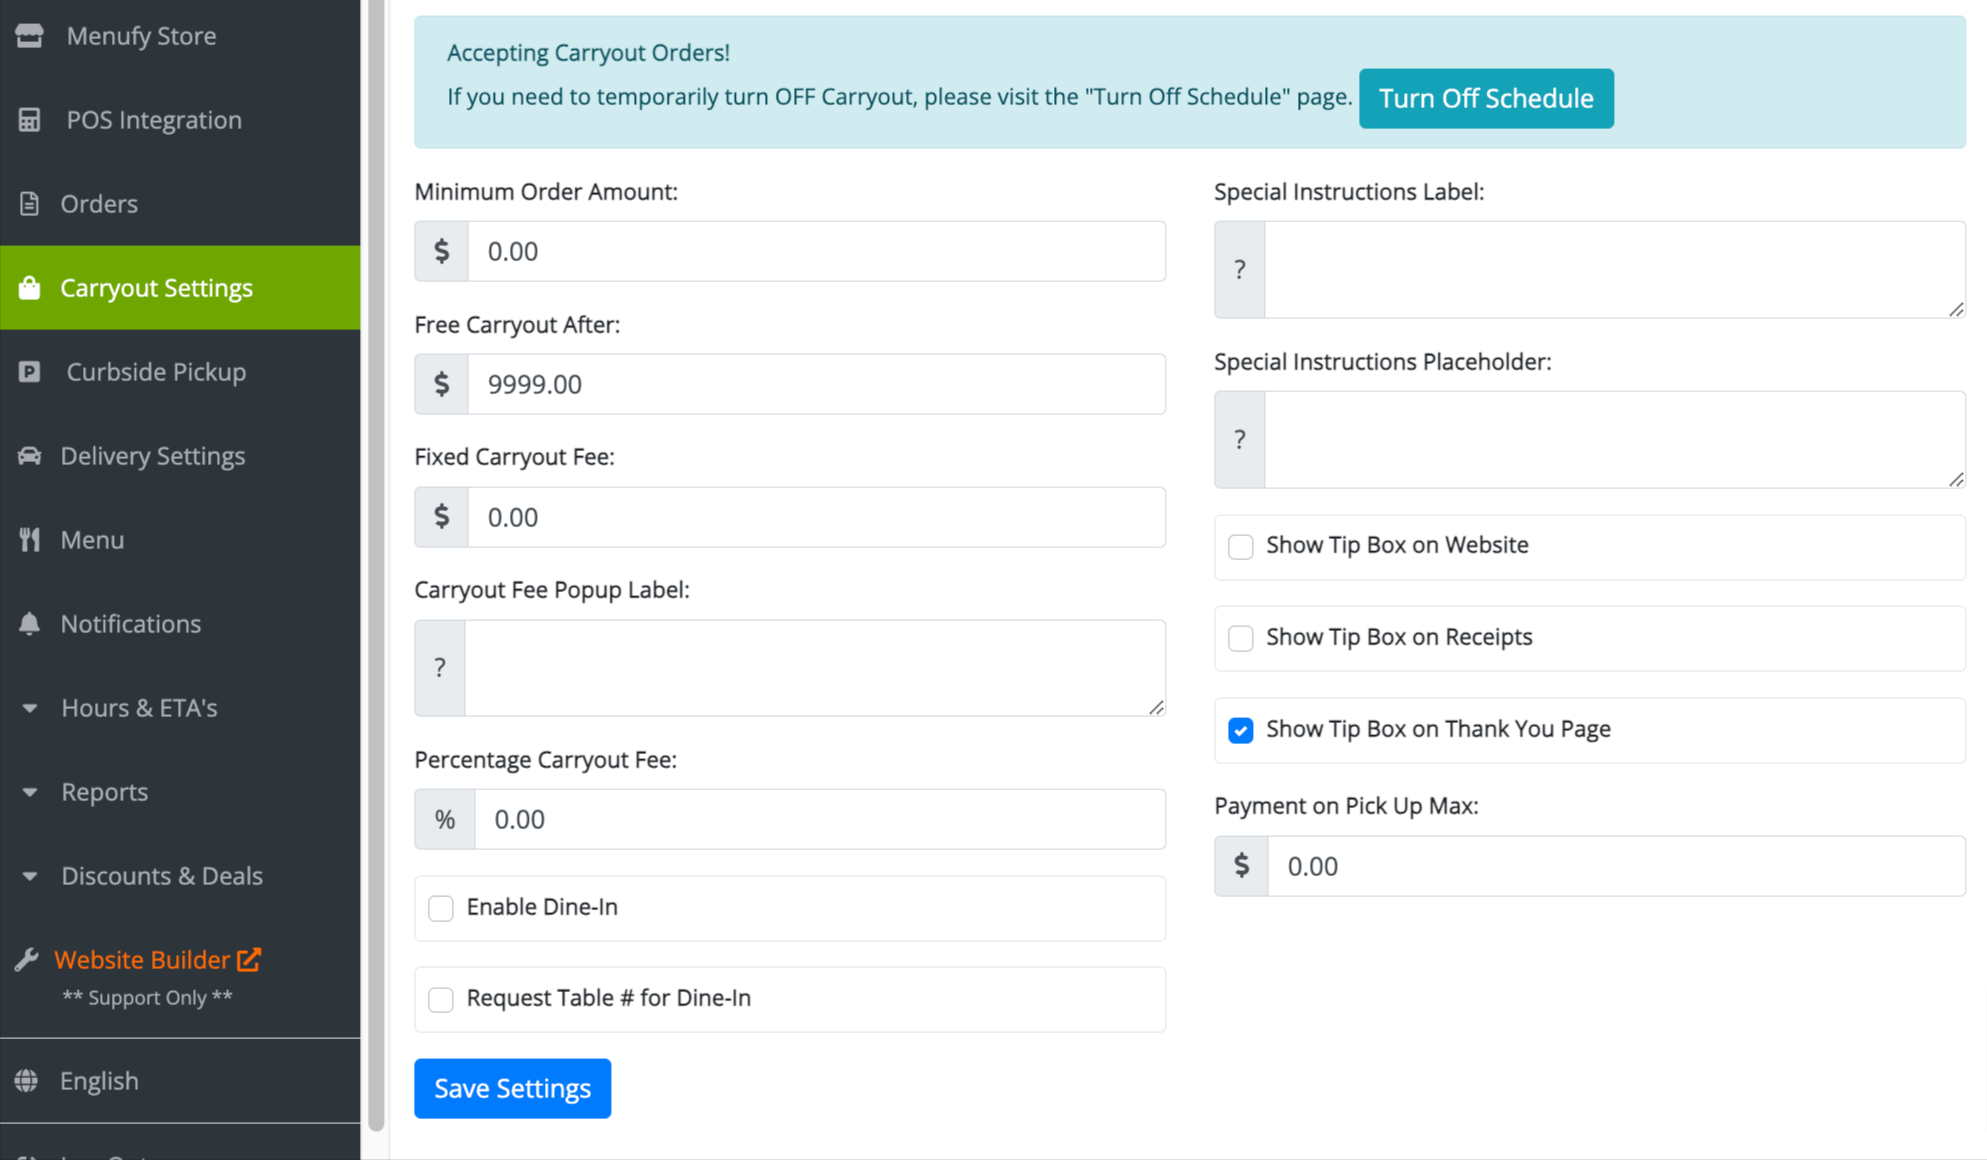
The blue highlighted area is a reminder that if you need to turn online ordering off for any reason or length of time, you can do so in the Turn Off Schedule tab. The button will take you to where you can set everything up.
1. Minimum Order Amount
This setting will default to $0.00. It means customers can order carryout for any amount. If you add a minimum order amount, your customers can only order carryout online if their subtotal meets or exceeds the set amount. We recommend leaving this amount at $0.00.
2. Carryout After
This setting defaults to $9,999.00. It means that orders more than the amount indicated will not be charged the convenience fee. We recommend leaving this amount at $9,999.00.
3. Fixed Carryout Fee
You can set a fixed carryout fee in addition to the existing Menufy convenience fee. We recommend leaving this at $0.00.
4. Carryout Fee Popup Label
If you want to add a message for your customers at checkout to explain the reason for the extra fees, you can add it in this text box.
5. Percentage Carryout Fee
Instead of a fixed carryout fee, you can set up a percentage carryout fee in addition to the existing Menufy convenience fee already added to online orders. We recommend leaving this field at 0%.
6. Enable Dine-In
This feature will allow you to take online orders for dine-in customers. We have had clients use this feature for drive-in and dine-in movie theater concepts, but it could also help if you don’t have enough servers.
7. Request Table Number for Dine-In
If you enable dine-in, you will want to use this feature. It provides a way for customers to enter their table number. For example, numbers are typically assigned to spots at the drive-in movie. The customer would put their spot number in this field, which will show on the ticket when the restaurant receives the order. It will help the staff know where they can bring the food.
8. Special Instructions Label
The instructions included in this field will be visible at checkout for your customers. You can leave any bit of information that you would like here. One example would be to include a message regarding the location where the customer is ordering if you have multiple locations.
9. Special Instructions Placeholder
This message will appear in the text box of the Special Instructions section. It can offer additional instructions or examples for your customers.

10. Show Tip Box
There will be three options where you can choose to show the tip box: Website, Receipts, or the Thank You page. The tip box will appear for your customers on whichever option you have selected.
11. Payment on Pick-Up Max
You can choose to allow payment at the time of pickup instead of payment online if the online order is under a certain amount. We recommend keeping this at $0 to ensure payment is securely processed online in order to avoid any risk.
Curbside Pickup
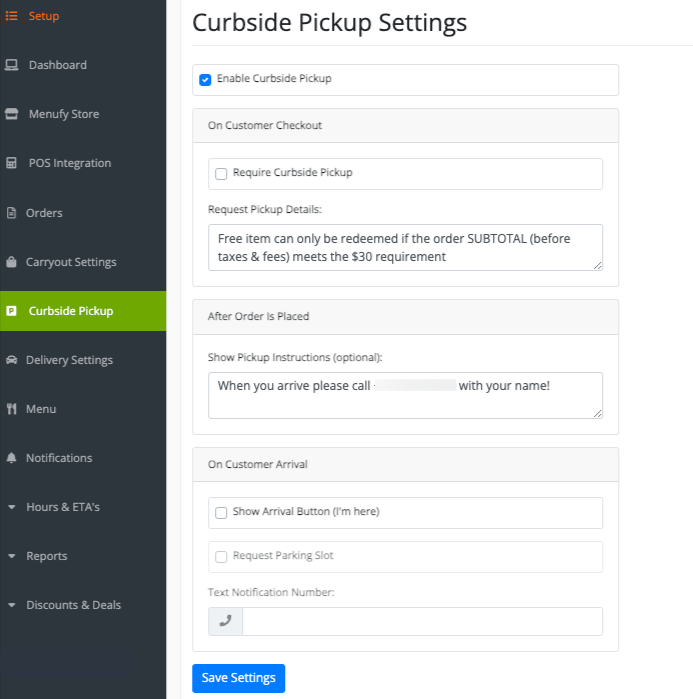
1. Enable Curbside Pickup
This section will be where you manage your curbside pickup settings. You can unselect Enable Curbside Pickup if you do not want to offer the service to your customers. However, we recommend offering curbside pickup to give your customers as many options as possible to receive their food.
2. Require Curbside Pickup
If you ever need curbside pickup at your restaurant, you can also adjust this setting. This would be helpful if you were open during a minor restaurant remodel.
3. Request Pickup Details
When a customer selects that they would like curbside pickup, a box will appear for them to leave details regarding the vehicle they will be in when they arrive. A placeholder message can be edited to whatever you want it to say. For example, if you have a drive-thru window, you could write that curbside pickup orders can be picked up at the drive-thru window. However, if you want them to leave the details of their car, we have a default message that will let customers know to leave this information.
4. Show Pickup Instructions (Optional)
Once the order has been placed, the customer will be taken to a thank you page, and you can leave directions for them when they pick up the order. This is optional, but some restaurants will include a number that can be called when the customer arrives.
5. Show Arrival Button (I’m here)
This button can appear on the Thank You page of online orders, where customers can press it to initiate a notification to the restaurant.
6. Request Parking Slot
This feature can only be used if you want to show an arrival button for your customers. You can request that the customers leave the parking spot number where they are parked.
7. Text Notification Number
If you enable the arrival button, you can put a cell phone number where the notification will be received.
Delivery Settings
You’re able to adjust your Delivery Settings as needed. If you need to turn off your delivery temporarily, you can easily do this from the blue box reminder that will take you to the Turn Off Schedule option.
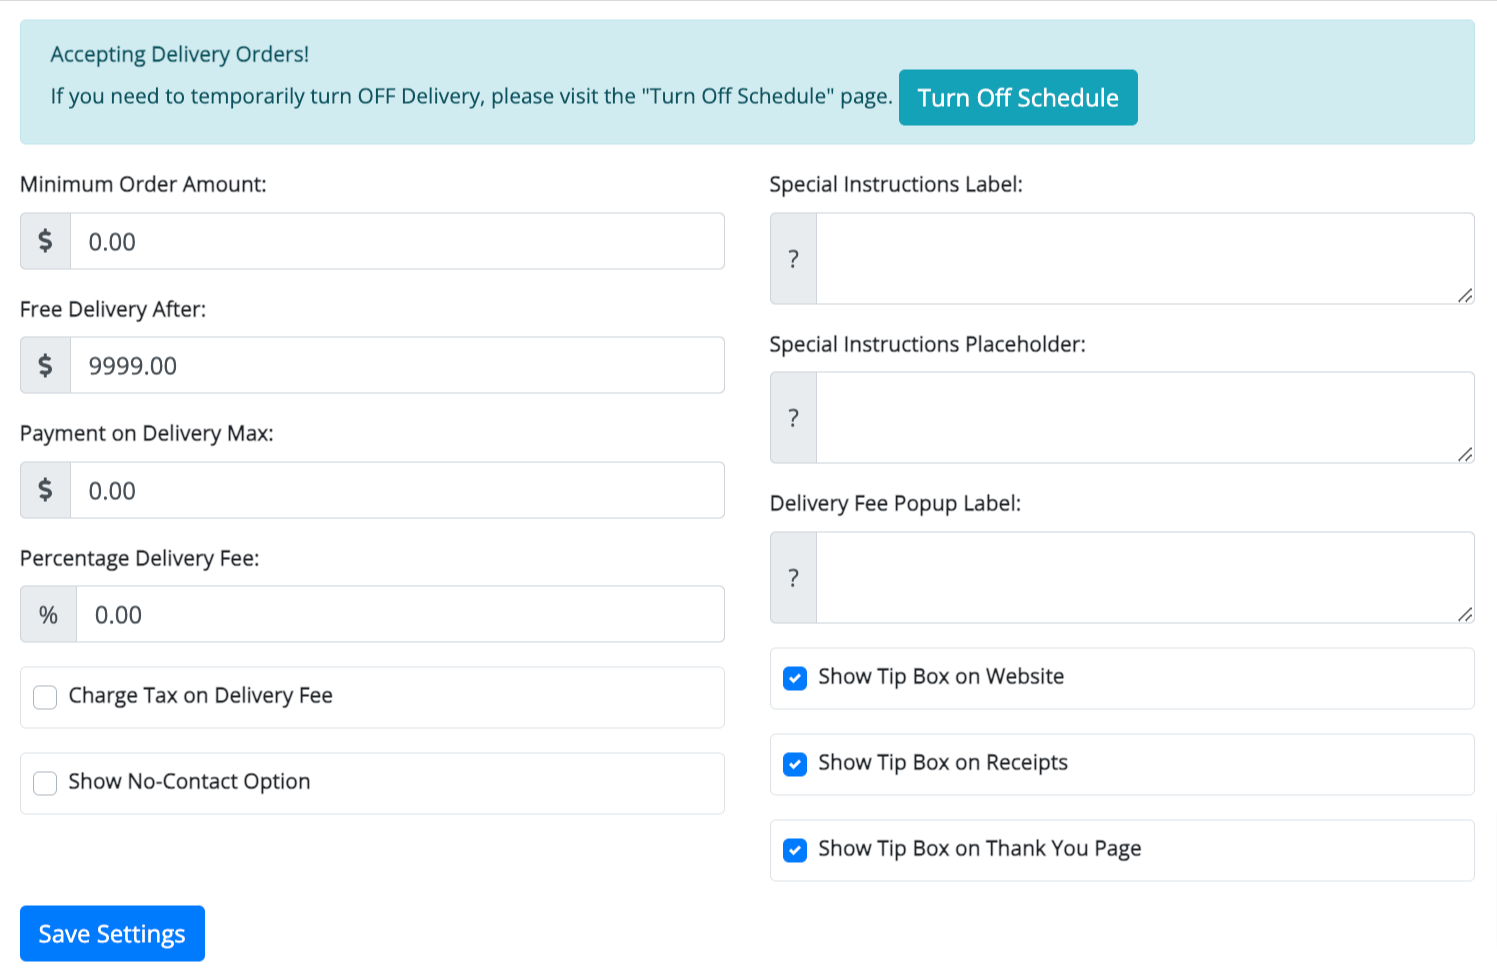
1. Minimum Order Amount
This is the required order amount to place an online delivery order. If you have this amount set at $15, this would mean a customer’s online delivery order subtotal must be $15 or more in order to place the order online successfully. This setting helps prevent your drivers from going out on deliveries for very small orders.
2. Free Delivery After
This setting will always be set to $9,999.00. It means that orders that are more than the amount indicated will have the convenience fee waived. We recommend leaving this amount at $9.999.00.
3. Payment on Delivery Max
If you want to allow online delivery orders to be placed and payment to be received upon pickup, you can set the maximum amount you want here. However, to avoid risk, we recommend leaving this at $0, with payment to be processed when the online order is placed.
4. Percentage Delivery Fee
You can set up a percentage delivery fee in addition to the $1.75 convenience fee. We recommend leaving this field at 0% and setting fixed delivery fees based on your delivery zones, which we will talk about soon.
5. Charge Tax on Delivery Fee
If you would like to charge a tax on the delivery fee you set, you can check this box. However, we recommend that you leave it unchecked.
6. Show No-Contact Option
If you would like to give your customer the option to select no-contact delivery, you can check this box. If it is selected, your customer can leave notes about how and where to leave the food upon arrival. We recommend selecting this box to give your customers delivery options.
7. Special Instructions Label
Similar to the carryout settings, the special instructions that are included in this field will be visible at checkout for your customers. You can leave any bit of information that you would like here. One example would be to mention that any additional condiments requested may incur additional charges.
8. Special Instructions Placeholder
This message will appear in the text box of the Special Instructions section. It can offer additional instructions or examples for your customers.
9. Delivery Fee Pop-up Label
If you want to add a message for your customers when they are at checkout to explain the reasoning for the extra fees, you can add it in this text box.
10. Show Tip Box
There will be three options where you can choose to show the tip box: Website, Receipts, or the Thank You page. The tip box will appear for your customers on whichever option you have selected.
11. Delivery Zones

If you are offering your own in-house delivery, you can set up the delivery zones and delivery fees in this section. You can set up radius delivery zones, ZIP code zones, and custom delivery zones. Once the zones are showing for you, delivery fees can be assigned.
In the same way that you set up delivery zones where you deliver, you can also set up delivery zones where you do not deliver. Once you see the custom delivery zones that you just created, you can select the Do Not Deliver checkbox, and our system will automatically exclude those zones from online delivery orders.
If you are utilizing third party delivery with Doordash or Uber through Menufy, the delivery zones are already set and cannot be changed.
Menu

Every tool we have covered so far can help you manage your Menufy online orders, but we think this next tool is one of the most underrated features that can take your business to the next level.
From your Menufy Manager, you can make minor menu changes whenever you need. If your Menufy account is integrated with a POS device, you must manage your menu on your POS account.
However, if you are a traditional Menufy client, you have some capabilities to update your menu from your Menufy Manager account. Here’s a quick breakdown of everything that you can do:
1. Update Category and Item Names and Descriptions
You can click on the name of either the category or item, and you will be able to edit it. There will be a description box visible where you can include details about the categories or items you offer.
2. Update Price of Individual Items (excludes POS Integration clients)
You can click on the price, and you will able to update it.
3. Show or Hide Menu Items and Categories
You will see an “ON” toggle for all categories and items, if you click it, the toggle will switch to “OFF,” and the category or item will disappear from your online menu for customers.
4. Add Food Tags to Items (ex. Gluten Free, Spicy, Vegetarian, etc.)
You can set the food tags up when you view the items of each category, and it can be set for each item.
5. Configure Item Options and/or Toppings
If you need to update the name of a topping or hide/show the topping option, you will be able to view/edit them when you view the items of each category.
Below the Toppings, you will be able to view and edit the Options available for each item. You can hide/show items, update prices, and indicate whether the option is already included with the item.
You can also update how many options are required and set the maximum of options that can be selected.
6. Set Category Hours
If your menu categories are only available on specific days or available during designated hours, you can update that from your Menufy Manager. This is great for day-of-the-week specials or happy hour categories.
7. Choose if Category or Item Is for Carryout, Delivery, or Both
This feature is great if you have menu specials that are only available for carryout or delivery.
8. Add Photos to Menu Items
This feature is worth looking into if you don’t already add photos to your menu! Adding appetizing photos to your menu for each menu item can help increase your online orders.
Ciyi Cai, one of Menufy’s customer success specialists, said, ”It’s worth it for restaurant owners to add food photos to their online menu.” Cai continues, “It’s a small update that will make a huge difference for their customer’s online ordering experience.”
The icon that shows the arrow pointing up is the upload button. If you have food photos ready to upload, you can click that button and upload an image for each item. If you’d like further instructions for the Menu tool, please check out our Menufy Help Center article that goes into further detail.
The Last Bite
In this second part of our A Look Inside Menufy Manager blog series, we went over the Carryout Settings, Curbside Pickup, Delivery Settings, and Menu tools and features.
To summarize, restaurant owners can review and adjust their Carryout, Curbside, and Delivery settings from the Menufy Manager. These settings include the details customers see when they are placing their order and setting up your restaurant's delivery zones.
We also talked about how restaurant owners are able to make minor menu updates from their Menufy Manager, including adjusting names, updating prices, and adding photos to each item.
Stay tuned for the final blog in this series, where we will continue our deep dive into Menufy Manager. We’ll cover the following:
Notifications
Hours & ETAs
Reports
Discounts & Deals
Want to learn more? Reach out to one of our experts and see how your restaurant can get more online orders!


ABOUT THE AUTHOR
NIKKI FINLEY, SR. DIGITAL MARKETING SPECIALIST
Nikki got her start in the restaurant industry when she was 15. She also spent some time working at tech startups in Chicago. Utilizing her many years of experience in the restaurant and tech space, she’s spent the last 5 years assisting Menufy clients with their premium marketing services.